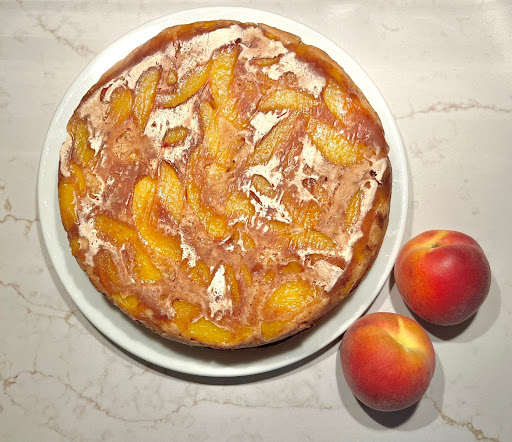
Peaches are a fruit that usher in the summer and leave near the beginning of fall. What better way to usher guests into your home than with this peach upside down cake? A rich sour cream cake topped with a juicy layer of sweetened peaches is sure to be a crowd pleaser.

THE INGREDIENTS
THE PEACH BOTTOM
Peaches: Well, to have a peach upside down cake, you really need peaches. We believe this fruit may not be as traditional as canned pineapple, but it really is a wonderful combination! We have not yet tried using canned peaches in this recipe, so we cannot comment on what to change if you are using that instead. If you are interested in other fruits, good substitutes are nectarines, plums, apricots, or cherries. We believe the peaches we used were small in size, so if you are using larger peaches, you may have to only use 4 or 5 in this recipe. Use your best judgement, and then add one more to be safe! If you don’t have enough, some cake batter will seep through your fruit layer, as you can see in our photo above. However, what we’re trying to show is that it is still delicious and completely A-okay!
Brown Sugar: Although peaches are sweet on their own, we really think it is a good idea to add brown sugar to the bottom. As the peaches cook with the cake, their juices will combine with this brown sugar to make a wonderfully sweet glaze. Thanks to the help of brown sugar, you really don’t need frosting or even whipped cream for a cake like this!
Cinnamon: Cinnamon and peaches go very, VERY well together. For that reason, we wanted cinnamon both in the cake and the fruit layer! Feel free to adjust this as you like, but we believe you at least do not need to increase the amount of cinnamon in this recipe. It’s a very pleasant amount.
Cornstarch: If we want a nice glaze on the top (or is it bottom?) of our upside down cake, why add cornstarch? After all, won’t that make things far too thick? Perhaps those were your initial thoughts when reading this ingredient list. Now, let us calm your fears and explain why!
When baking the peaches in this cake recipe, they release juices. Not just a little itty bitty teaspoon of juice, but quite a lot. Now, if you were to pour a lot of juice on top of a cake, what would happen? It would get soggy, that’s what. Without cornstarch, that is essentially what happens to our cake. By adding cornstarch, the layer thickens to maintain that gooey glaze without being a juicy mess. Although you may be used to adding cornstarch as a slurry, evenly coating the peach slices should be sufficient as they are already juicy and the cornstarch will also get plenty of liquid throughout the baking process.
THE SOUR CREAM CAKE
Sour Cream: One time, we read a recipe for a “sour cream” dessert that had no sour cream in it. That sure was confusing. We call it how we mean it here, so of course we had to add plenty of sour cream to our sour cream cake!
Sour cream adds lots of wonderful fat and moisture to our cake. It also is acidic, helping to activate our baking soda and help with rise. It makes it a little bit more dense, which is what we were going for. A denser cake can stand up to having a nice layer of fruit on top. Our other fat in this cake is butter, which is known to make drier cakes. However, the moisture-giving properties of sour cream balance it well. This may be a higher sour cream to flour ratio than most recipes, but we say you should give this a shot!
Butter: With a juicy layer of fruit, we didn’t want an overly moist cake cake on the bottom. Butter adds fat and flavor to our cake without making it as moist as oil does, making it the better juice for this recipe. We personally use unsalted butter, but feel free to use what you have on hand.
Eggs: Luckily, you can’t taste eggs in cake! Without them, though, this cake would be nowhere near as good. Weird, right? Eggs help to bring our dry and wet ingredients together, as well as ensure our batter mixes into a cohesive blend. Eggs are not something you want to change in this recipe!
Flour: This is an ingredient you wouldn’t want to forget in this cake! Flour adds thickness to our cake, as well as texture. We don’t recommend changing the amount of flour in this recipe. When too much flour is added to a cake, it becomes dense and dry. Not only that, but the more flour there is, the more spread out your flavor is! Less flavor per bite isn’t the goal of most bakers, we believe. If you go too skimpy on the flour, though, then your cake will be all gummy, not fluffy and moist. If you don’t have all purpose flour on hand, all we can recommend at the moment is cake flour as a substitute. In that case, increase your flour by 3 tablespoons and omit the cornstarch in this recipe entirely.
Cornstarch: Cornstarch again? Yup! By adding cornstarch to our mix of all purpose flour, we are roughly making cake flour. What we are also doing is achieving a tender, softer, and fluffier cake.
White Sugar: Although this is a dessert that pairs well with the molasses-y flavor of brown sugar, we couldn’t let brown sugar have all the fun. White sugar adds sweetness to our cake without adding as much moisture as brown sugar does. This helps to ensure our cake is not too wet, which is a good thing! If you want a less sweet cake, we wouldn’t recommend reducing the white sugar in this recipe. It actually already is “not too sweet” tasting! There is no 3 cup-sugar frosting on this thing, so no worries! If you want to increase the sugar and have a sweeter cake, we’d recommend increasing the white sugar over the brown sugar. However, be aware that this may come with textural changes-especially if you increase the sugar by a lot.
Brown Sugar: With cinnamon in the batter, we’d dare say this is a sour cream spice cake. So, what spice cake doesn’t benefit from the wonders of brown sugar? To throw in a little molasses-y flavor and just a bit more moisture, we add ¼ cup of brown sugar in this cake batter. Light or dark brown sugar would work here, but we personally use light brown sugar.
Baking Soda: Do you want a brick or a cake? If you want a cake, you better add this baking soda! Activated by the acidity in our sour cream, it brings rise to this thick cake batter. We do not recommend decreasing the amount in this recipe or increasing it. Doing so can either make a cake too dense or rise so much it collapses!
Salt: A little bit of salt to balance the sweetness, don’t you think? Salt luckily isn’t detectable when you eat this cake, but it contributes to its overall flavor all the same.
Cinnamon: Cinnamon and peaches go very, VERY well together. For that reason, we wanted cinnamon both in the cake and the fruit layer! Feel free to adjust this as you like, but we believe you at least do not need to increase the amount of cinnamon in this recipe. It’s a very pleasant amount.
Vanilla Extract: When it comes to making things like chocolate cake, we tend to skip the vanilla extract as we find it gets covered up anyway. Many say it makes the chocolate taste better, but we find many can’t really tell the difference. When it comes to spice cakes, though, that’s a whole different story! Vanilla blends so well with the warm cinnamon and is a wonderful background flavor. If you really love vanilla, feel free to increase this to 2 teaspoons. Anything more and it might be too central than the peaches in terms of the cake’s flavor. Anything less than 1 teaspoon and you might not really pick any of its flavor up as you eat the cake.
KEY INFORMATION:
How Do You Peel a Peach?
While there are many techniques out there-from a sharp knife to even boiling the peaches to get the skin off, we say it is best to stick with a vegetable peeler. Talk about easier, safer, and quicker!
How Do You Slice a Peach?
We have two main methods for this.
The first we call “the avocado”. Slice around the pit and then twist one half of the peach until it splits into two halves. From there, carefully cut out the pit and then slice as normal.
Our preferred method, however, is quartering the peach. We think it leaves less peach still stuck to the pit. It also works great when your peach is too stuck to twist into 2 halves using “the avocado” method. Slice around the pit in one direction, as if you were going to cut an avocado. Then, slice around the pit in another direction, so your two cuts intersect as perpendicular lines. (Remember the symbol: ⊥). This should make 4 roughly equal quarters of your peach. From there, tug slightly at each quarter and slip your knife as much against the pit as you can. You will break off 1 quarter at a time, and then slice as normal.
Do You Have to Arrange the Peaches for a Peach Upside Down Cake?
Yes and no. You don’t have to, but you risk some cake batter leaking through and ruining that look of a super-pretty fruit layer. (Exhibit A: the photo we have up for this cake right now!) With that being said, it doesn’t ruin the flavor of the cake or the fruit. Texture wise, it is more ideal to also bite into one cohesive layer of fruit instead of a fruit and cake mixture. It gives more of that jam and “topping” feeling that reduces your desire for the cake to be slathered in frosting.
To properly arrange the peaches, place the peach slices down into a single layer. Try not to leave gaps, as every gap is an opening for that cake batter! After you have a single layer, try to overlap some peach slices over the spots where one peach slice is connected to another. This further prevents cake batter leaking through.
Why Did Cake Batter Leak Through My Fruit Layer?
It happens! This either means you did not arrange the peaches into a tight enough design or you just didn’t have enough peaches. Your cake will still be great, but either work on your slice placement skills or add another peach to the pan next time. It takes trial and error to get that perfectly pretty cake!
How Do You Make an Upside Down Cake Not Stick To The Pan?
Two things: parchment paper and a little oil. Parchment paper on the bottom and sides means your cake can’t adhere to your pan. This is great as you can slightly tug on the parchment paper when getting the cake out and it will be lifted out of the pan. The oil is there to make sure that your cake doesn’t stick to the parchment-but at least that would not stick as bad as it would to metal! With these two things, we have had no trouble with the peach layer getting separated from the cake!

Ingredients
Method
- Peel and slice the peaches.
- In a small bowl, combine the peaches, cornstarch, brown sugar, and cinnamon. Toss to combine.
- In a parchment paper lined and greased1 10" springform or circular pan2, place the peach slices down into a single layer. Try not to leave gaps, as every gap is an opening for that cake batter! After you have a single layer, try to overlap remaining peach slices over the spots where one peach slice is connected to another3.
- Preheat the oven to 300 F / 150 C.
- In a large bowl, mix together all of the dry ingredients.
- Add the wet ingredients, ensuring the eggs and melted butter are at room temperature, and mix to combine. Do not overmix!
- Pour the cake batter directly on top of the peach layer.
- Bake at 300 F / 150 C for 55 minutes.
- Cool the cake for 30 minutes and then invert on a plate or serving platter.
- Enjoy plain or with whipped cream!
Leave a Reply